A non-catalog order is used to purchase goods or services that are not available from a hosted or punchout catalog, or in situations when a check request form is unallowable.
Click a button below to jump to that section of the page.
A non-catalog order is used to purchase goods or services that are not available from a hosted or punchout catalog, or in situations when a check request form is unallowable.
Click a button below to jump to that section of the page.
In BUY.IU, navigate to the Shopping - Ordering (Other) dashboard and select the Non-Catalog Item link in the BUY.IU Links widget.
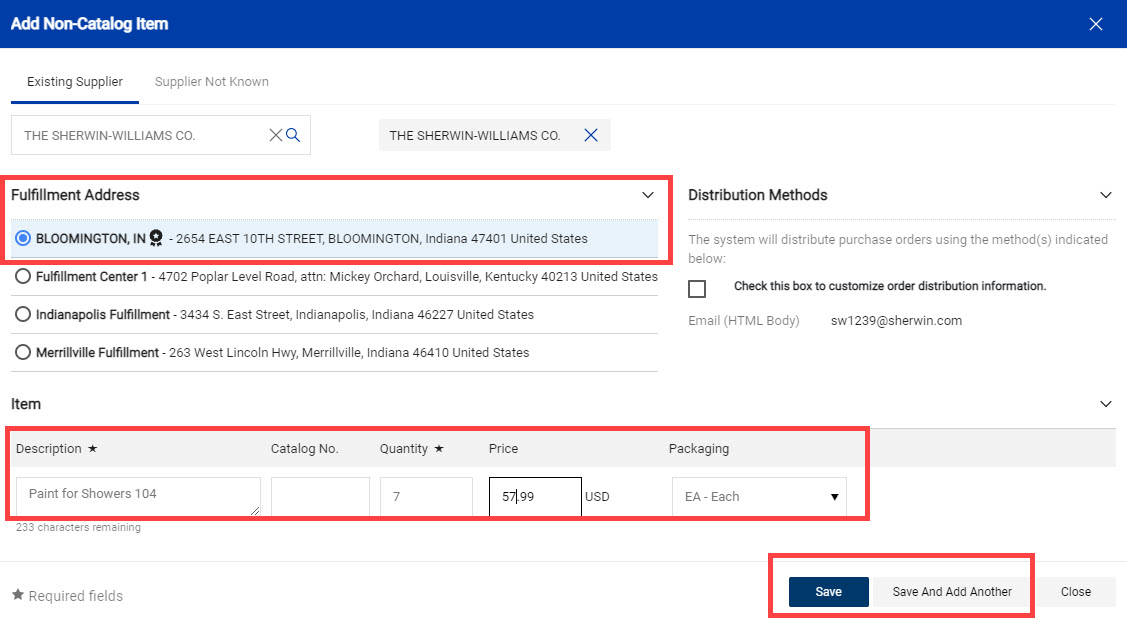
A new window opens. Select your supplier by typing their name or supplier ID number (which starts with "p") in the Select Supplier Search bar.
Select the appropriate Fulfillment Address. This step is extremely important! The Fulfillment Center drives where your order and payments will be sent. Click here to learn more about Fulfillment Centers to ensure you select the correct one.
Next, enter the item description, quantity, price and packaging. Click Save And Add Another to add an additional line item(s).
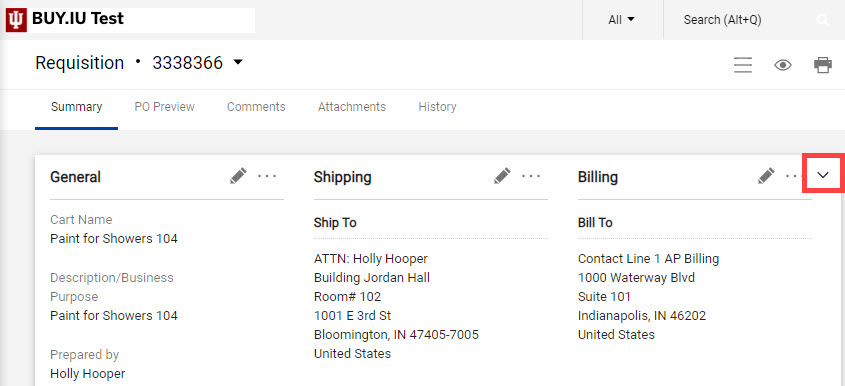
Update the Cart Name field. Enter a description of what is being purchased. This field is searchable and will appear in your approver's review list. If desired, enter additional details explaining the reason for the purchase in the Description/Business Purpose field.
Next, scroll down the page and review your order's line items one final time and make any necessary changes. Quantities may be edited in the cart directly. To update a unit price or packaging type, click the item description.
Additional text may be entered in the External Notes field if necessary. This may be needed if your product description did not fit in the item description field, or if there is additional information that the supplier should be aware of. Information entered here appears on the purchase order that is sent to the supplier.
You may need to add a commodity code to your order. Click the magnifying glass in the Commodity Code field to search for commodity code.
A new window opens. In the middle search field, Description contains..., type a keyword associated with the items being purchased. Select the + sign next to the commodity code you wish to use to return the code to the cart.
In this example, we searched for the word "paint."
Choose a commodity code using your best judgement. Purchasing will update the commodity code during their review if another commodity code should have been used.
The commodity code is added to the line item. Repeat these steps if additional lines are missing commodity codes.
The menus below contain instructions for additional edits you may need to make, depending on your order.
Click the three dots next to the supplier name. If a discount only applies to a specific line item, not the entire order, click the three dots next to the line item that should be discounted. Click Add Discount to apply the discount.
In the example below we will apply a discount to the entire order.
A new window opens. If the supplier provided a discount code, enter that information in the Pricing Code field. Next, select the appropriate radio button next to Percentage or Amount and enter the discount in the following field. Click Apply to save the discount and close the window.
In this example we are applying a 25% discount using code PAINTSALE.
The cart is updated and the discount is visible below the impacted line items.

Capital assets are items with a value of over $5,000, a usable life of at least one year, and depreciate over time. Check the box next to Capital Asset? to mark a line item as a capital asset.
An object code starting with "7" must be used on line items marked as capital assets. This information will be entered in the Accounting Codes section after clicking Proceed to Checkout.
In the requisition, missing information and fields will be highlighted in the right sidebar. Click an error message to jump to that section of the document and enter the required information. This walk through will demonstrate the most common edits.
Each section of the requisition can be collapsed or expanded by clicking the chevron located in the top right of the section.
Orders that require review or creation of a contract by Purchasing must be marked as restricted. This forces the order to route through Purchasing for review.
Click the pencil icon next to the General section.
A new window opens. Check the box next to Order Restricted? to mark the order restricted. The checkbox will turn into a green check mark when marked. Click Save.
Log a comment on the requisition which includes the Contract Request Form number and form name.
Update shipping information by clicking the pencil icon next to the Shipping section.
A new window opens. Addresses you have saved to your profile appear automatically. Select a saved address, or search for a different one using the search field at the bottom of the window.
All IU addresses are included in the search. If you're having trouble locating the correct address, try searching using the street number only. If you need to ship items to a non-IU address search for "Building Not Found" and enter address details. Refer to SOP-PURCH-23: Ship to a Non-IU Address for additional details.
In this example, we'll search for "Showers" and select the address that is returned. Enter a Room number and click Save.
Scroll down the page and complete the Accounting Codes section. The instructions below demonstrate how to apply account information to the entire order.
Click the pencil icon in the upper right corner of the section or the red Required error message to edit the fields.
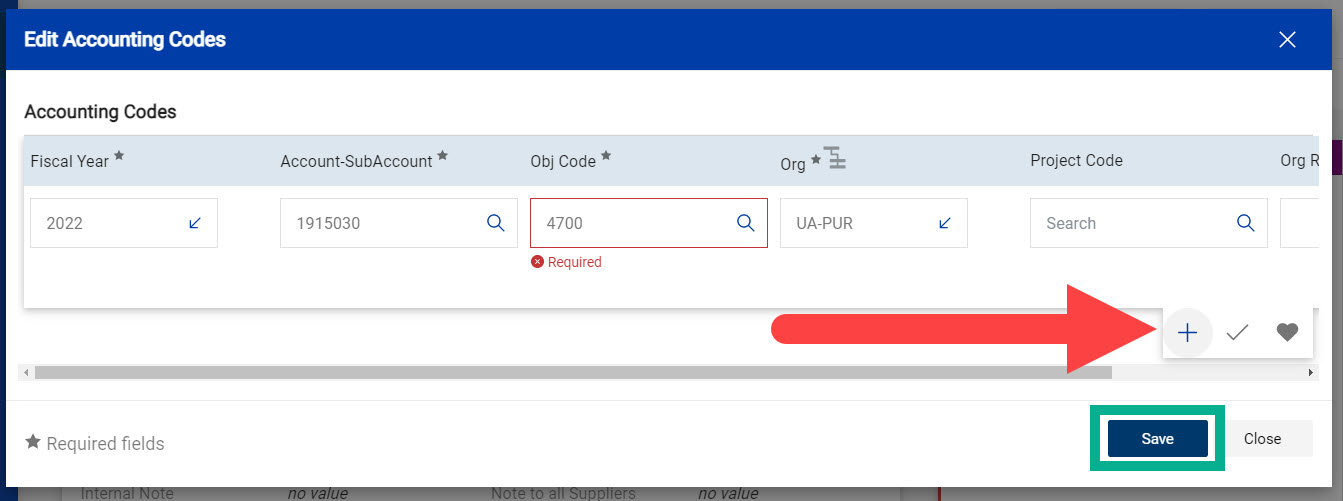
A new window opens. Click the heart icon in the bottom right-hand corner of the window to access your saved account favorites.
Otherwise, search for the account number you wish to use by typing in the Account-SubAccount field. Valid account options are populated as you type. Click the account number you wish to use. You may also search by clicking the magnifying glass.
In this example we'll use account 1915030.
Enter an object code in the Obj Code field. Enter the first few digits of an object code and BUY.IU dynamically returns results. Click the magnifying glass to search through a full object code list.
In this example we'll use object code 5000.
If you need to split the order over multiple accounts or object codes, click the + button in the bottom right-hand corner. Click here to learn how to split accounting information appropriately.
When all edits have been made, click Save.
If your order contains multiple lines that involve different accounts, object codes, or both, scroll down the page until you reach the Lines section. Click the three dots next to the line item description.
Next, select Accounting Codes from the Override menu.
A new window opens which will contain account information entered in the Accounting Codes section above.
Edit the information as needed. The details you enter here will override details entered at the order level. Click Save when done.
The menus below contain instructions for additional edits you may need to make, depending on your order.
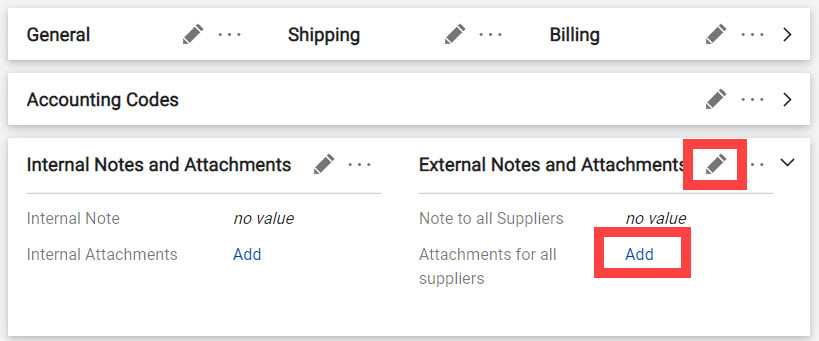
If the supplier has requested documentation be bundled with the purchase order, attach it in the External Notes and Attachments section.
Click the Add link to upload attachments. If you need to add a note to the supplier, such as requesting order confirmation or other special instructions, click the pencil icon to add a note.
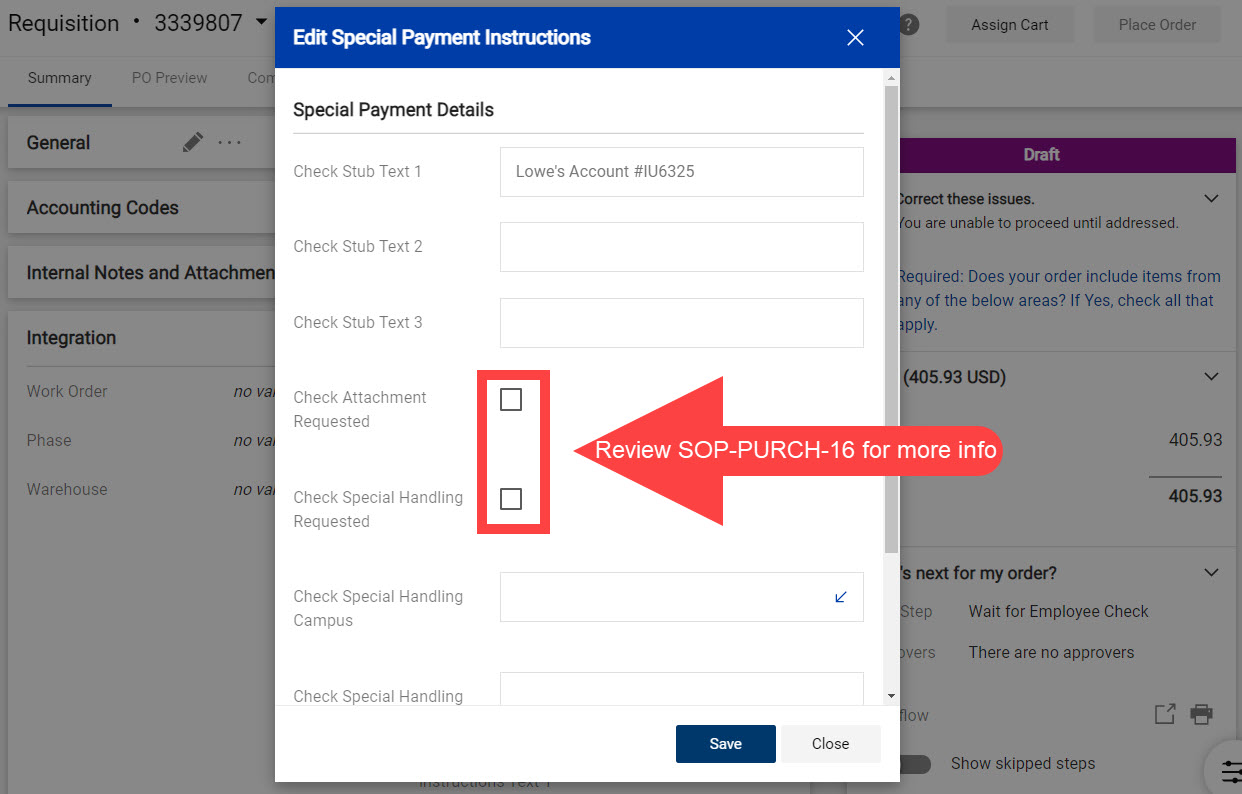
Enter details such as your account number with the supplier, a description of the event or purchase, or any other details that will help the supplier identify what the payment relates to in the Special Payment Instructions section.
Click the pencil icon next to Special Payment Instructions to add these details.
Information entered in Check Stub Text 1, 2, or 3 will appear on every payment issued to the supplier. In the example below, we've entered our department's account number with Lowe's, the supplier. This helps the supplier match our payments to the appropriate account in their system.
If you need to request information be bundled with your payments, or to request check pick up, review SOP-PURCH-16: Special Payment Instructions. This SOP defines when the Check Attachment and Special Handling options should be completed and how to complete them.
Either of these options will force payment to be made via paper check for the entirety of the order. Check Attachment and Special Handling should be used rarely and in specific situations.
Click Save to save your changes.
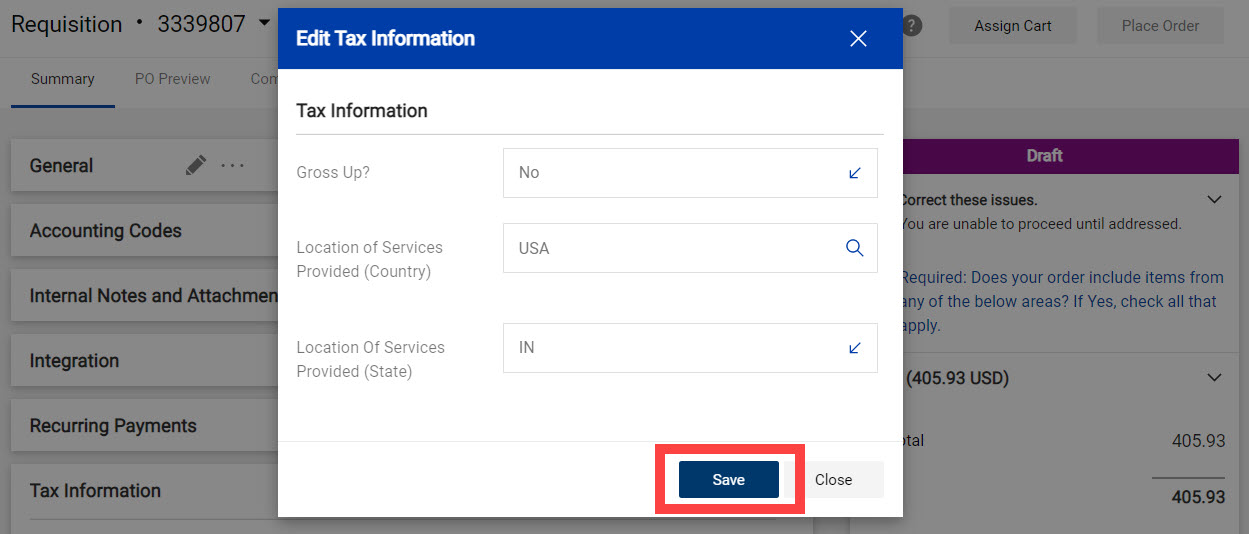
The Tax Information Section must be completed if your order involves service object codes such as 4520, 4535, or 4562. Click here for a full list of service object codes.
If you use service object codes and fail to complete these fields, your requisition will be returned to you.
Select the pencil icon next to Tax Information to complete this section.
Review the Completing the Tax Information Section page for a full walkthrough of completing this section, including an explanation of the Gross Up? option.
Generally, always complete the Location of Services Provided (Country) field with the country where services will be performed. If working with a US-based supplier complete the Location of Services Provided (State) field with the state where services are being performed. Type in the field and BUY.IU generates options.
Click Save when finished.
Finally, review and complete the Compliance Section. Click the pencil icon to open this section.
A new window opens. Review the list of items a with check boxes next to them. Click the down arrow in the first field. If your order includes any of these types of items listed below, select Yes. Otherwise, select No and click Save.
If you selected Yes, check the box next to the restricted item(s) your order includes, then click Save.
Not sure what to select? Review the Compliance Section page to learn more about each option listed here.
Review the error status section and confirm that all required fields are complete. Review your order one last time and click Place Order to submit the order.
You will not be able to edit the order after you click Place Order. Review before you click!
The page refreshes and displays a confirmation message like the one pictured below.
Congratulations! You've placed a non-catalog order.
INDIANA UNIVERSITY
Financial Training & Communications
Cyber Infrastructure Building (CIB)
2709 E 10th St
Bloomington, IN 47408
Email: estc@iu.edu