After the requisition with capital line items in Buy.IU has been approved, the individual listed as Prepared By on the requisition will receive the Asset Configuration Document in their KFS action list to complete. The Asset Configuration Document must be completed before the Purchase Order is sent to the supplier.
To view an example of a configuration document with multiple systems, please visit Appendix A.
Navigation Menu
The Asset Configuration Document is broken down into different pages that can be navigated to easily from the navigation menu on the left of the screen. The different pages are:
Overview: Displays all the summary information about the order including links to the PO in Buy.IU and quotes attached to the order. The capital payments on the PO are displayed in the Accounting Lines section of the page.
Workflow: Displays all notes and workflow actions that have occurred on the document. Allows user to add a note, send a note, or ad hoc route the document to another user.
Systems: Contains the capital line items from the PO. This is the section of the document where the initiator will configure the assets and provide the required asset information.
Configuring Assets
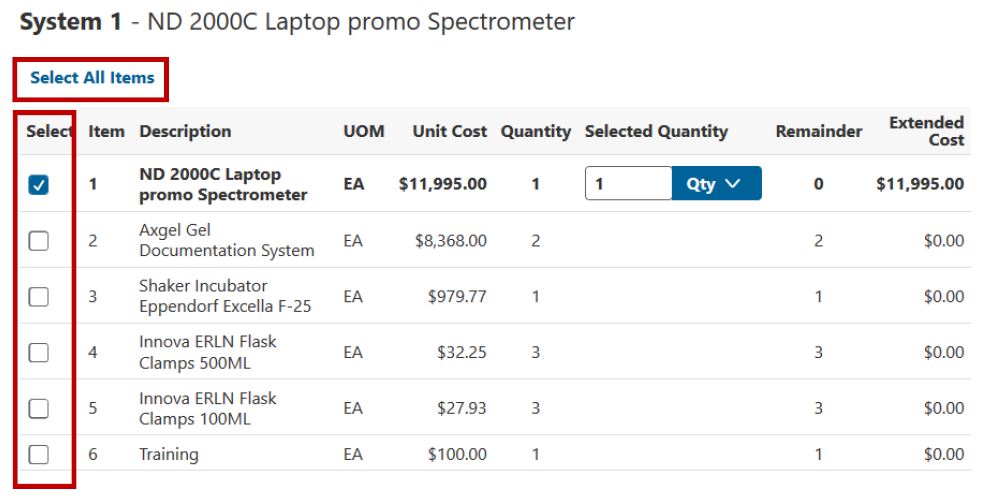
To begin configuring assets, navigate to System 1. All line items marked as capital on the PO will be displayed on this page initially.
The select boxes in the far left column are used to select items to configure into system assets.
- If the item is an individual asset, only the single item will be chosen before completing the asset information section of the document.
- If all items combine to make a single system asset, then click the Select All Items button to select all items.
- If there are multiple systems, then select the lines that combine to make up the first system, enter the asset information for that system, then repeat for the next system.
See Appendix A for a detailed example with instructions on how to configure multiple systems.
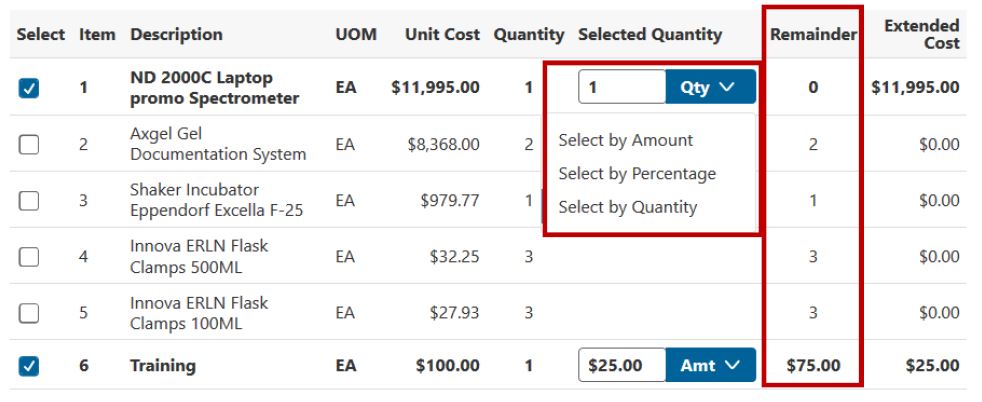
After items are selected a drop down menu appears in the selected quantity field for the items selected. There are three options:
- Select by Amount: Enter the dollar amount to be included in the current system. Usually used if item has a quantity of 1 and needs to be allocated to different assets (i.e. training).
- Select by Percentage: Enter the percentage of the amount to be included in the current system. Usually used if item has a quantity of 1 and needs to be allocated to different assets (i.e. training).
- Select by Quantity (default): Enter the quantity of the items to be included in the current system.
As items are selected, the amount in the Remainder column is updated to show what item quantities, percentages, or amounts remain to be configured. Amounts, percentages, or quantities selected cannot be greater than the remainder or an error will be displayed.
The next decision is to decide if items selected in the current system will be a new asset or will be added to existing assets.
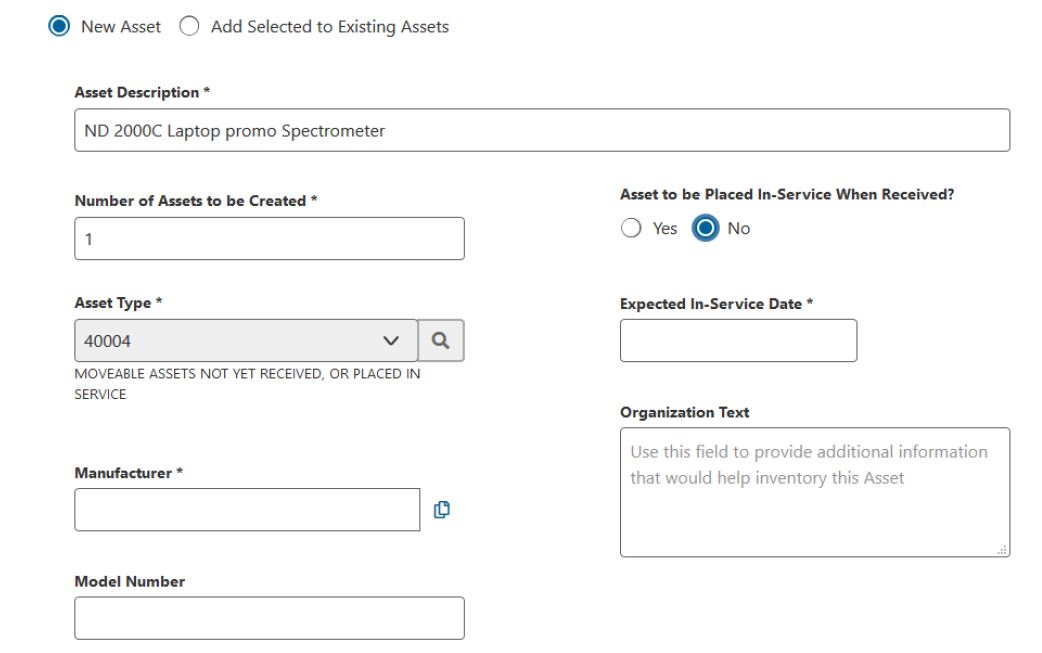
- Select New Asset if purchasing items that will be new assets. This option is defaulted as this is the most common selection.
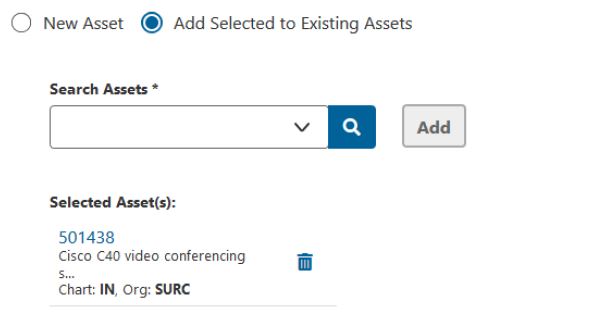
- Select Add Selected to Existing Assets if purchasing items that will modify existing assets. This option is used for items purchased to upgrade an existing capital asset in our system.
Enter capital asset information. All fields marked with an * are required to be completed.
New Asset
- Asset Description: Will automatically populate with the description of the first item selected. If this does not accurately describe the asset, update the description by typing it in the text box.
- Number of Assets to be Created: Defaults to the quantity of the first item selected and defaults to blank if multiple items are selected with different quantities. If quantity is different than the default, change the quantity by typing in the text box.
- Asset to be Placed in Service Within 30 days of Receipt?:
- Select Yes if you expect the asset to be used within 30 days of receiving it from the supplier.
- Select No if not expected to start using the asset right away. For example, if buying equipment for a kitchen that is under renovation and is not expected to be open to the public until August of next year.
- Expected In-Service Date: Only displayed and required if No is selected for previous question. This field can be populated by typing in the date or selecting the date from the calendar. This date must be at least 30 days in the future from today's date or an error will be displayed. This date will be populated in the organization text field of the asset for inventory internal control purposes.
- Asset Type: Determines the life span of the asset. The description or code can be typed directly into the text box or can be searched from the list by clicking the magnifying glass icon.
- If you selected No for the in-service question, the asset type code will automatically default to 40004 and cannot be changed from this value unless the in-service answer is changed to Yes. This will prevent the asset from depreciating until it is placed in service.
- Organization Text: Optional field to provide additional information that would help inventory this asset.
- Manufacturer: Can be typed directly into the text box. If the manufacturer is the same as the supplier, click the duplicate button to the right of the box to automatically populate the supplier name in this field.
- Model Number: Enter model number in the text box.
Location

- Enter the location where the asset will be used.
- Qty: Enter the number of assets to be located in this location. The sum of the quantities in the location section must equal the value in the Number of Assets to be Created field above or an error will display.
- Campus: Enter the campus in the text box or select from the drop down values.
- Building: Eiither the building code or name can be typed into the text box or can be searched by clicking the search icon to the right. Value entered must be a valid building code.
- Room: Enter in room number or search for available rooms by clicking the search icon. Value entered must be a valid room for the building selected.
- SubRoom: Enter sub room, if applicable.
- Off-Campus: Select if asset will be used in a building that is not listed in the official IU building list.
- Name: Enter name of building if it has a name.
- Address: Enter street address of off-campus building.
- City: Enter city of off-campus building.
- State: Enter state of off-campus building.
- Country: Enter country of off-campus building.
Add Selected to Existing Assets
- Asset Number: Enter asset number in the text field or search for an asset by clicking the search icon.
- Add: Click to add asset number. This will add the asset with description, chart, and org to selected asset(s) section below and provide a blank text box to enter additional asset numbers, if applicable. If you added the incorrect asset, click the trash icon to delete the asset.
Select next action from available action buttons presented at the bottom of the screen.
Action Buttons
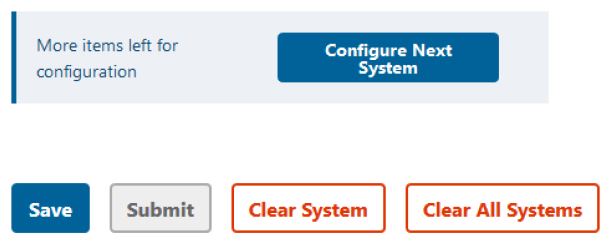
- Configure Next System: This button is only presented if there are items still left to configure. Click this button after completing all the required capital asset information for the current system. This will reset the screen to begin configuration on the next system.
- Save: Saves the document and checks for errors.
- Clear System: Unselects all items and clears all data related to the current system only.
- Clear All Systems: Resets document to its original state and deletes all data for all systems. Only select this button if you want to start the entire document over again.
- Submit: Checks for errors and submits the document. This button is greyed out and not available to select until all items have been configured.


